Creating quotes or a statement of work can take a considerable amount of time. PSOhub makes it easier by leveraging contract templates, teams and rates, budgets and planning. Your quote is published and shared with your customer for digital signing before being promoted to a project.
In this article, we will look at creating and previewing a quote before publishing.
Important: Before creating a quote, please check PSOhub's Marketplace & Integration settings for HubSpot. In the menu bar, click the gear icon and select Marketplace & Integrations. In the HubSpot tile, you will see a Settings link. Clicking on this link will display the Share HubSpot connection message. By clicking the Share HubSpot connection with all child organizations switch, you can confirm that you wish to share your HubSpot account with multiple PSOhub organizations:

Click Save.
Create a quote
In PSOhub, click the Quotes menu:


Click on the HubSpot tile to create a quote from a HubSpot deal.
The Search window appears below. Enter the name of the deal (you can type the first few characters) and click Search. In the search results, select the deal you wish to create a quote from:
The Quote Quick Setup: Step 1 window appears: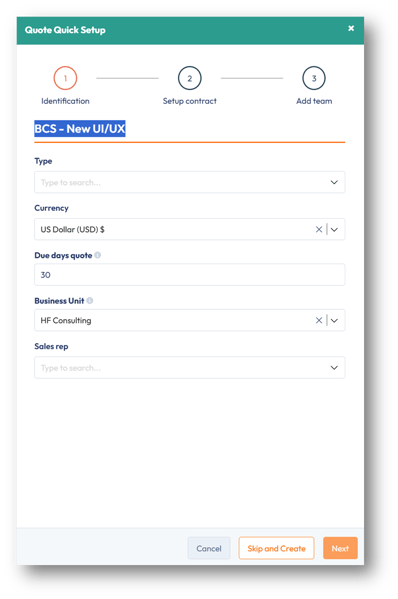
|
Field |
Description |
|
Name |
The name of the quote or statement of work. |
|
Type |
The quote type which is automatically picked up from the Project type settings. |
|
Currency |
Select the currency for the quote. By default, your base currency will appear. |
|
Due days quote |
The number of days the quote is valid for once it has been submitted. This is defined in the Quote settings but can be overwritten here. |
|
Business Unit |
By default, the top business unit in your organization structure will be selected. If you wish to change the business unit owning this project, you can select it from the drop-down list. The business unit will determine the users who can be assigned to this project. |
|
Sales rep |
Select the sales rep in your organization who is responsible for this offer. |
Click Next for step 2: Setup contract:
Click Next for step 3: Add team:
Configure the quote


The following fields can be modified:
| Field | Description |
| Date | Date of the quote. By default, today's date is shown. |
| Due days quote | The number of days the quote is valid for (the Expires on date updates automatically). |
| Test Quote | A temporary or sample quotation created for testing purposes. |
| Project estimated start date | The start date the project is expected to start. |
| Quote contact | The point of contact for receiving the quote. |
| Sales rep |
The salesperson or account manager responsible for the quotation. This individual is linked to the quote to identify who prepared or owns it within the sales process. The sales rep will only see the quotes that he/she has been assigned. |
| Project manager |
If known, this is the person responsible for overseeing the delivery of the work or services described in the quotation. |
| Business unit |
The business unit, legal entity, department or team owning the quote. It determines how the quote is categorized for reporting, financial tracking, and permissions. |
| Quote PDF language |
The language defined to generate the PDF version of the quote to send to the customer. |
| PO number |
If the purchase order number is issued, it will be linked to the quote and later the project. |
| Tags |
Tags are labels or keywords assigned to a quote to help categorize, organize, and filter quotations within PSOhub. They make it easier to search, group, and report on quotes based on specific attributes or business criteria. |
Click Save.
In the Contract, you can use the Budget tab to calculate your budget per contract line.
Note: If you already know who will be assigned to your eventual project, you can click the Team tab and select your team members. This will allow you to select the team members in the Budget tab.
This is also where you will finalize the quote. For instance, the financial agreement of the deal/opportunity: fixed fee, fixed fee installments, recurring fixed fee, T&M, monthly T&M, retainer, expenses, or products.
Note: The contract template should be defined as you would for a project. How you configure it will be carried over to the project (including smart invoicing). You can set up installments, retainers and dates at the quote level.
Preview quote
Once you have completed the contract billing information, you can preview the quote.
Click Preview and Publish:

Here, you will see a 4-step process to finalise the quote for publishing.
Step 1: Header: Complete the header information to appear at the top of the quote. This will be displayed in the preview on the right-hand side:
| Field | Description |
| Date and Expiration date | The start and expiration dates. When a submitted quote has expired, it will be read-only with no option to sign or decline. |
| Created By and Email |
This is the Sales rep with their email address. Note: These fields are mandatory for the quote to be published. |
| Customer and Contact |
The customer name will be shown and non-editable. The quote contact person at the customer can be selected, if not already. |
| PO number |
The purchase order number, if known. |
| Project estimated start date |
The estimated project start date. |
| Add comments (optional) |
Additional text to be added to the header. Standard text can be configured in the Quote settings under Default comment. |
Click Next.
Step 2: Quote lines appears:
Here, you can make last-minute changes to the contract lines, which will be reflected in the preview opposite.
Note: By default, the Budget values are not displayed in the quote. If you require the Budget to appear as an estimate for T&M or Expenses, click on the contract line(s) and in the Advanced tab, check the Display estimate on quote (Budget) box. If you do not want a contract line to appear in the quote, uncheck the Show on quote box:
Click Next.
Step 3: Footer appears:
In the footer, you can enter text here or set default text in the Quote settings under Default footer. The text will appear in the footer of the preview.
Click Next.
Step 4: Appendix appears:
The appendix allows you to select the relevant material for the quote:
| Appendix | Description |
| Appendix A: Teams and Rates | Select this check box to display the roles and rates as defined. |
| Appendix B: Plan and Timeline | Select this check box to display the task lists. |
| Appendix B: Timeline | Select this check box to display the Gantt chart for tasks and any dependencies. |
| Appendix C: Budget planning |
Select this check box to display the team members or roles planned hours, the value of those hours and the hourly rate. If team members have not been identified, it will be marked as TBD (To be Determined). Note: Keep in mind that any resources you select will appear on the published quote, which may lead the customer to perceive them as confirmed project resources. |
| Files Include files | Link or upload documentation to support the quote. |
Click Preview and Publish.
The complete quote is ready for final viewing. Once you are satisfied with the quote, you can click Publish as PDF to create a PDF document for emailing to your customer or Publish as Link to create a web page for digital signing. Click Back to Quote to return to the contract, or click Edit Quote to go back to the Step 1: Header of the quote preview.
Related articles
Publish a quote
How to extend a submitted quote that has expired
Sign or decline a quote
Revoke a quote
Copy a quote
Delete a quote
View the profitability of a quote