My Resource Planning is your personal dashboard for managing and viewing your assigned hours across projects. It gives you a clear, centralized view of your workload, helping you plan your day, stay on top of deadlines, and ensure your hours are allocated effectively.
Choose from the menu Resource Management > My Resource Planning.

Upon opening My Resource Planning, a summary of your personal planning across the year is displayed.

The screen comprises of three main data components:
-
Available: this is related to your capacity. It is made up of your remaining capacity and the total capacity. As your hours are planned, the remaining capacity will decrease.
-
Total: this is the total number of hours that have been planned for you.
- Month/Week/Day Totals: depending on which view has been selected, the total number of planned hours for each month, week or day will be listed.
View planned hours for all projects
To view your planned hours across all projects, click on either the Expand all button or click on the down arrow icon next to your name. Once expanded, all projects will be listed:

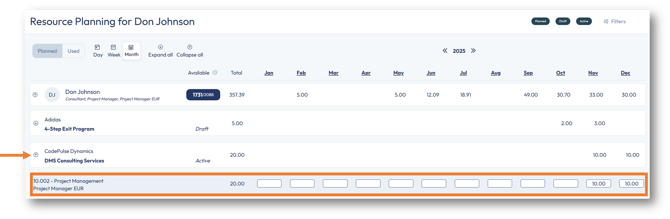
In the above example, the project DMS Consulting Services for the customer CodePulse Dynamics displays planned hours for the Project Management contract line in November and December.
As a project manager, you have edit permissions to add or modify your planning by clicking on any of the cells:

Please note: Hours planned at the month level are automatically allocated and evenly spread across the associated week and day views.
Actual hours view
Once you start booking hours towards a project, you can use the Actuals view in My Resource Planning to compare your booked hours with planned hours.
To do this, click on Used in the top-left corner:

This view adds an additional row for each line, listing the number of hours booked against each specific contract line, allowing you to easily compare it with the planned hours:

Where the booked hours have exceeded planned hours, the hours will appear in red.
Switch between Month, Week and Day views
My Resource Planning can be broken down by Month, Week or Day view:

| Month |
In this view, the calendar year is broken down by months, from January to December. To navigate to a past or future year, use the left or right arrow buttons. In the fields below each respective month, you can enter the number of hours that you expect to complete towards that particular contract line. To easily navigate from one month to another, use the Tab key on your keyboard. Important: As hours are entered on the Month View, these hours will be evenly split across all weeks of the month and all days of the month. After entering hours in the Monthly View, check the Week and Day Views to confirm the hours are distributed as expected. Important: To remove a value in the grid, you must enter a 0 in the field to override the previous value. Pressing the backspace or Delete will not remove the current value. |
| Week | Click on the Week button, or you can click on any of the 12 months to open the Weekly View for the selected month.
In the Week View, the month selected is broken down into weeks. To navigate to a past or future month, use the left and right arrow buttons.
Note: For some months, there may be weeks which overlap with other months. Such weeks will appear in the Week View for both months. Important: As hours are entered on the Week View, these will be evenly split across all days of the week and will also contribute to the planned hours for the month. It's a good idea to check both the Day and Month Views once hours have been entered on the Weekly View. Important: to remove a value in the grid, you must enter a 0 in the field to override the previous value. Pressing the backspace or Delete will not remove the current value. |
| Day |
Click on the Day button or click on any of the weeks for a particular month to open the Day View on the selected week. In the Day View, the selected week is broken down into individual working days from Monday to Friday. To navigate to a past or future week, use the left and right arrow buttons.
Important: When planning hours on the Day View, note that the total hours planned will contribute to both the planned hours for the week and the planned hours for the month. After planning hours in the Day View, review the Week and Month Views to ensure the hours are aligned correctly. Important: to remove a value in the grid, you must enter a 0 in the field, to override the previous value. Pressing the backspace or Delete will not remove the current value. |
Filtering in My Resource Planning
It's possible to filter your planning based on your role, business unit, your projects, and project stages. To do this, click on Filters in the top-right corner:

Related articles:
My Resource Planning for Admin and Controller Access Level Users
My Resource Planning for Team Member Plus Level Users
My Resource Planning for Team Member Level Users